Table of Contents
In the world of Kubernetes, managing complex applications can quickly become overwhelming. Enter Helm: a powerful package manager for Kubernetes that simplifies deployment and management through the use of Helm charts.
This guide will dive deep into Helm charts, exploring their structure, benefits, and how to leverage them effectively in your Kubernetes ecosystem.
What is a Helm Chart?
A Helm chart is a collection of files that describes a set of related Kubernetes resources. Think of it as a package that contains all the necessary information to create an instance of a Kubernetes application. Helm charts provide a template-driven approach to defining, installing, and upgrading even the most complex Kubernetes applications.
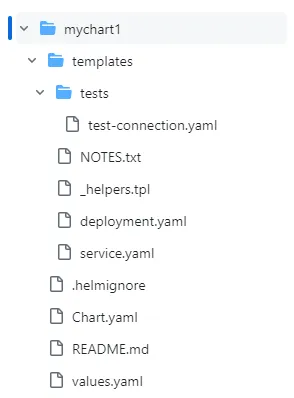
The Anatomy of a Helm Chart
A typical Helm chart consists of the following components:
- Chart.yaml: This file contains metadata about the chart such as its name, version, description, and maintainers.
- values.yaml: This file defines the default configuration values for the chart. These values can be overridden during chart installation or upgrade.
- templates/: This directory contains template files that generate Kubernetes manifest files when combined with values from the
values.yamlfile.. - .helmignore: Specifies files to ignore when packaging the chart.
Benefits of Using Helm Charts
- Simplified Complex Deployments: Package multiple Kubernetes resources into a single unit.
- Version Control: Easily manage different versions of your application deployments.
- Reusability and Sharing: Share charts across teams or with the wider community.
- Customization: Override default values without modifying the chart itself.
- Rollbacks: Quickly revert to previous versions if issues arise.
- Dependencies Management: Manage and version dependencies between charts.
Creating Your First Helm Chart
Step 1: Install Helm
First, install Helm by following the instructions on the official Helm website.
Step 2: Create a New Helm Chart
Create a new chart with:
helm create my-first-chartThis command generates a directory structure with sample files.
Step 3: Understand and Modify the Chart Structure
Navigate through the created files:
- Modify
Chart.yamlto update metadata. - Adjust
values.yamlto set default configurations. - Edit files in the
templates/directory to define your Kubernetes resources.
Step 4: Define Kubernetes Resources
In the templates/ directory, define or modify Kubernetes resources. For example, a basic deployment might look like:
apiVersion: apps/v1
kind: Deployment
metadata:
  name: {{ include "my-first-chart.fullname" . }}
  labels:
    {{- include "my-first-chart.labels" . | nindent 4 }}
spec:
  replicas: {{ .Values.replicaCount }}
  selector:
    matchLabels:
      {{- include "my-first-chart.selectorLabels" . | nindent 6 }}
  template:
    metadata:
      labels:
        {{- include "my-first-chart.selectorLabels" . | nindent 8 }}
    spec:
      containers:
        - name: {{ .Chart.Name }}
          image: "{{ .Values.image.repository }}:{{ .Values.image.tag }}"
          ports:
            - name: http
              containerPort: 80
              protocol: TCP
Step 5: Customize values.yaml
Adjust values.yaml to set default values:
replicaCount: 2

image:
  repository: nginx
  tag: "1.21.0"
  pullPolicy: IfNotPresent

service:
  type: ClusterIP
  port: 80
Step 6: Test Your Chart
Use helm lint to check for issues:
helm lint ./my-first-chartThen, perform a dry-run installation:
helm install --dry-run --debug my-release ./my-first-chartStep 7: Package and Install Your Chart
Package your chart:
helm package ./my-first-chartInstall the chart:
helm install my-release ./my-first-chart-0.1.0.tgzAdvanced Helm Chart Techniques
Using Helm Hooks
Helm hooks allow you to intervene at certain points in a release’s life cycle. Common use cases include:
- Running a job to set up a database before installing the main application.
- Performing a backup before an upgrade.
Example of a pre-install hook:
apiVersion: batch/v1
kind: Job
metadata:
  name: {{ include "mychart.fullname" . }}-pre-install-job
  annotations:
    "helm.sh/hook": pre-install
spec:
  template:
    spec:
      containers:
      - name: pre-install-job
        image: busybox
        command: ['sh', '-c', 'echo Pre-Install Job']
      restartPolicy: Never
Chart Dependencies
Manage dependencies in your Chart.yaml:
dependencies:
  - name: apache
    version: 1.2.3
    repository: https://charts.bitnami.com/bitnami
Update dependencies with:
helm dependency updateCreating a Helm Chart Repository
- Package your charts:
helm package mychart/- Create an
index.yamlfile:
helm repo index --url https://example.com/charts .- Host the
index.yamlfile and packaged charts on a web server.
Best Practices
- Version Your Charts: Always update the version in
Chart.yamlwhen making changes. - Use Semantic Versioning: Follow SemVer for your chart versions.
- Document Your Chart: Maintain a comprehensive README.md file.
- Validate Values: Use schema validation in
values.schema.jsonto ensure correct input. - Use Helper Functions: Leverage Helm’s built-in functions and create custom ones in
_helpers.tpl. - Security: Be cautious with sensitive data. Consider using Kubernetes Secrets or external secret management solutions.
Troubleshooting Common Issues
- Chart Installation Fails:
- Check cluster connectivity
- Verify RBAC permissions
- Ensure required values are provided
- Template Rendering Issues:
- Use
helm templateto debug - Check for syntax errors in templates
- Upgrade Problems:
- Review release history with
helm history - Use
--dry-runflag to test upgrades
Conclusion
Helm charts provide a powerful way to manage Kubernetes applications. By mastering Helm charts, you can significantly streamline your Kubernetes deployments, making them more maintainable, version-controlled, and easier to share across teams.
As you continue your Helm journey, remember to stay updated with the latest Helm documentation and best practices in the ever-evolving Kubernetes ecosystem.